It occurred to me that as our shader gets more complicated, we haven’t really been doing anything to make it neater. I’d like to take a few moments to clean it up a bit before we go any farther. As you make your own shaders this is a good habit, especially if you want to share them with others.
We should’ve done this in the first post, but the first step is to name our material! It’s still “Material” and that’s a terrible name. So, first, rename it to “RedOak” or something similar (“red_oak”, “oak_wood_red”, etc.). I tend to name my shaders with my initials, like so: “DECWood_RedOak”. Just make sure it’s descriptive.
Next, let’s clean up the node graph a bit. Select the nodes that pertain to our newly-added Rays, and move them slightly down and away from the other nodes:
Also note that I’ve lined them up neatly and moved the Multiply node so that the connection doesn’t cross any nodes. Now add a Frame (Add->Layout->Frame). Deselect the Frame, and select all the other nodes. Push ‘G’ to Translate them (just like objects in the Viewport) and drag them onto the Frame. The Frame should expand to hold all the nodes like this:
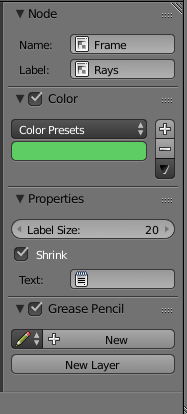
The open the Node property pane (press ‘N’), and change the Label to Rays. Also check the “Color” checkbox and choose a color for the frame. I chose a green color; you can choose whatever you like or even leave it gray:
I think it might also make sense to encapsulate our nodes that make the rings, which are these:
Repeat the same steps: Add a Frame, then drag and drop the nodes onto the Frame. Add a label of “Rings” and choose a color:
Lastly, I grouped these five nodes into a “Grain” Frame:
Zooming out and rearranging a bit, and now we have a much neater, easier-to-understand node network:
You can, of course, arrange your own networks however you choose. Perhaps my choice of organization doesn’t make sense to you. I’m also just showing some basics…there are other things you can do with Node Groups and Rerouting and Input values, but for now this has been enough of a diversion! I’m sure you want to get back to the fun part of the shader, so thanks for bearing with me for a few minutes. See you next time!


